Pasta e Fagioli

Pasta e Fagioli is peasant food – or what my Italian grandmother simply calls “pasta and beans.” I made this version with onions, chard, fresh parsley & basil, elbow macaroni, pink beans, and cheese. I prefer a nice sharp pecorino Romano cheese, but any Italian type grating cheese will work and even cheddar will do in a pinch.


Pasta e Fagioli

  • 2 Tbsp Extra Virgin Olive Oil (EVOO)
  • 1 large onion, diced
  • 1 bunch fresh chard, chopped
  • 1/2 lb. cooked elbow macaroni (I use gluten free)
  • 1 28-oz can chopped or crushed tomatoes
  • 2 tsp (or more) granulated garlic
  • 2 cups (or 1 can) cooked beans
  • 2 oz Romano, Parmesan or Asiago cheese
  • A handful of fresh basil and parsley, chopped (or a couple teaspoons of each dried)

Cook the macaroni. Saute the onion & chard in EVOO til soft. Add the chopped tomatoes and granulated garlic. Let it come to a bubble, then add herbs, cheese and cooked pasta. Season with salt and pepper. Cook until the ingredients heat through and meld into a saucy, delicious dish!

Dietary notes: a healthy dose of protein and fiber; ♥ Vegetarian ♥ Gluten Free Option

Cost: About $2.10 per serving with gluten free pasta (I use Tinkyada rice pasta) or $1.75 with conventional pasta.

Gluten-free Pizzaschetta, Five Minute Foodie Style!

Today I worked the last outdoor farmers market of the season. For those who don’t know, I work for a local organic vegetable grower, selling his vegetables at a local market. It’s a nice change of pace for this city girl and it supplies most of the fresh local veggies you see me cooking with here. The farmers market is such a wonderful little community, and there’s generally no place I’d rather be. But today it was COLD (in the low 40s) and DAMP! As much as I love Upstate New York, I have to admit the weather sometimes tests our relationship.

To add insult to injury, the market manager bought us all pizza from the best pizzeria in town. It smelled delicious, but this wheat and gluten avoidant girl stayed strong. I’m not a confirmed celiac, but I’m definitely cereal grain sensitive. I gave up wheat 3 years ago and have been avoiding other sources of gluten for about 4 months. I can handle either on occasion, in small doses, but I have to be very careful. If I surpass my sensitivity threshold, my body starts to ache, aggravating my fibromyalgia symptoms. Or I get a headache or the sniffles. So, most of the time I just don’t tempt fate. But, boy, did that pizza smell good! So, I came home and whipped my own gluten free version. After all, pizza is mainly bread, tomatoes, cheese and a few seasonings. I had gluten free bread, tomatoes and cheese – so, what’s wrong with taking a few liberties to satisfy a craving? I named it such because it has the flavors of pizza, but is assembled like bruschetta (then baked). Now, doesn’t that sound yummy?

Gluten-Free Pizzaschetta

Three slices gluten free bread
1 medium tomato
1-2 shallots or a little onion, chopped fine
1 Tbsp olive oil
Dried or chopped fresh herbs (I used dried oregano and fresh basil)
1 or more kinds of cheese (I used a combo – feta, Romano and cheddar)

Lightly toast your bread slices. Dice the tomato and put it in a mesh colander or sieve and press lightly to extract the excess juice. Mix tomato with the chopped onion or shallot, the herbs and olive oil. If using feta, crumble a little and add to the tomato mixture.

Lay out the toast on a cookie sheet or foil and pile your tomato mixture on top. Broil about 10 minutes on the lowest shelf; you want to warm the tomatoes through & perhaps get a tiny bit of bubbling or browning on top. Your ktichen will fill with a lovely roasted tomato smell.

Top the slices with whatever cheese you choose – it’s nice to have a good melting cheese in the mix, which is why I chose a combo of cheddar and Romano. Move the broiler shelf up; it should take just a few more minutes to melt the cheese on top. I like it a little bubbly.

The bread got a bit soggy from the fresh tomatoes, but the crust was crispy. I may swab the cooky sheet with a bit of olive oil first next time, because there was a tiny bit of sticking. I was quite happy with the delicious result, though!

“Sprouted Bean Trio” salad

My sister sent me a bag of Tru Roots “Sprouted Bean Trio” that I was excited to try after her rave reviews.  She says she gets it in 3 lb bags at Costco for less than $10. The Sprouted Bean Trio is a quick-cooking mixture of sprouted lentil, adzuki and mung beans. I’m a big fan of ready-to-eat cold dishes, so I made a basic salad, along the lines of tabouli. The result was delicious, with the sprouted beans having a nice light texture. One cooked cup has 11g protein and a whopping 11g fiber. The package claims that the sprouted beans “boosts the nutritional profile” and makes them more digestible. I cooked 1 cup of the mixture in 3 cups of water, as instructed, but had to drain some off. I ended up with perhaps 3-1/2 cups of cooked product. The millet cooked up to about 3 cups. This recipe made close to 8 cups; that was enough for about 5 generous servings that I augmented with some additional vegetables and/or protein to make a meal. It would go further as a side dish. Any grain would work here; I used millet because I was following one of my Five Minute Foodie organizing tips: use what you have.

Sprouted Bean Trio Salad

  • 1 cup (dry) Sprouted Bean Trio, cooked
  • 2/3 cup (dry) millet, cooked
  • 1/3 bunch chopped parsley
  • 1/3 bunch chopped scallions
  • 1 large carrot, diced
  • 2 TB EVOO
  • Juice of half a lemon
  • Salt to taste

Cook the Sprouted Bean Trio and Millet according to directions. Combine bean, grain and vegetable ingredients. Whisk olive oil, lemon and salt together and toss. Enjoy this yummy salad on its own or with additions of crumbled feta or goat cheese, chopped egg or sliced veggies.

Dietary notes: a healthy dose of protein and fiber; ♥ Vegan. Sub quinoa for the millet to make it ♥ Gluten Free.

Cost: less than $4 for the batch, or $ .50 – $1 per serving, depending on how much you use. And that’s with organic ingredients!

Poor man’s caprese

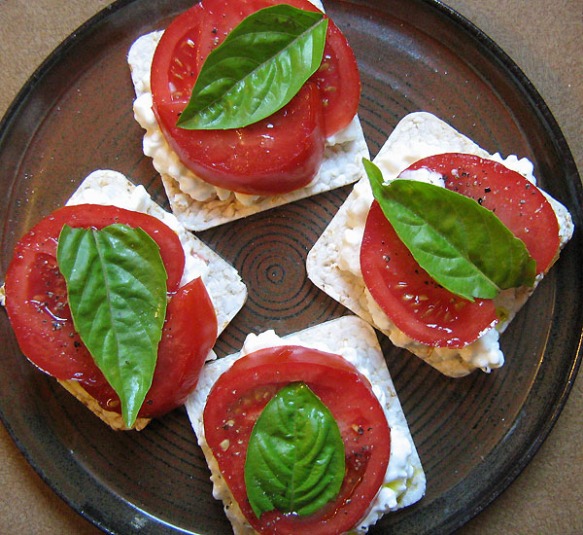
A favorite among foodies is fresh mozzarella with tomatoes and basil, dubbed an “Insalata Caprese” or Caprese Salad for its Italian roots in Capri. Although less pricey than the original’s buffalo milk mozzarella, fresh mozzarella made from cow’s milk is still a luxury item when you’re eating on a budget. And, like many types of cheese, it has a relatively high fat to protein ratio. So, this poor man’s version substitutes cottage cheese and serves it up on crackers or bread. This still has that light, fresh taste, but it’s higher in protein and lower in fat, even if you use full-fat cottage cheese. You can use any bread or cracker as the base; I used a thin rice cake for this gluten free version, but it would be great with a rye crispbread or sliced baguette, too. This makes a great snack or light meal. I think I’d like it with tomato soup, too, despite the redundancy.

Poor man’s caprese

  • Crackers, crispbread or sliced baguette
  • Cottage cheese
  • Thick-sliced tomato
  • Basil leaves
  • Extra virgin olive oil (EVOO)
  • Salt & Pepper

Spread 2-3 Tbsp cottage cheese on each cracker. Top with tomato slice, a drizzle of EVOO, salt, pepper and basil leaf. Nosh & enjoy.

Dietary notes: Lots of lycopene & Vitamin A, C & K from the tomato and a healthy dose of protein and calcium from the cottage cheese. ♥ Vegetarian ♥ Gluten Free

Cost: about $2.50 with a half-pound organic tomato.

Simple cucumber salad

Cucumbers are one of my favorite summer vegetables. I love their cool crispness and often snack on wedges on their own or with hummus. This simple salad is another way to enjoy them and a wonderful way to use both cucumber and mint when your summer garden is bursting with them.

Cucumber salad

  • Diced cucumbers
  • Coarsely chopped mint
  • Chopped scallions
  • Extra virgin olive oil
  • Vinegar
  • Salt (kosher or ground specialty salt is nice)
  • Toasted caraway seeds (optional)

Toss all ingredients together, going lightly with the olive oil and vinegar. I tend to use a ration of 2-3 part olive oil to vinegar. Serve sprinkled lightly with caraway seeds, if you like. This is lovely with cottage cheese, on a salad, or as a cooling side dish. I sometimes toss in tomatoes right before serving.

Dietary notes: vegan, gluten free, grain free.
Cost: about $.75 for a 1-cup serving

Flourless banana pancakes

YUM. I’m still reeling from the deliciousness of these amazing little banana pancakes! They were so delightful – moist on the inside and slightly crisp on the outside – that it’s hard to believe they’re both gluten AND grain free! And because they were so flavorful, already cooked in butter and textured just right, I didn’t have to butter them and used just a fraction of my usual amount of Vermont maple syrup.

The inspiration came from Grain-Free Foodies but, as I tend to do, I gave  it my own twist. This is a bit of a splurge in terms of fat content, but it’s from good quality sources with a healthy balance of monounsaturated, polyunsaturated and saturated fats (and some of that butter does get left behind in the griddle). Plus, it has a decent amount of protein (19g). The recipe below was just enough for a single serving, but can easily be multiplied. And, did I mention how EASY these were to prepare? I did all the mixing in my 2-c Pyrex glass measuring cup with a fork, then poured the batter from there right onto the griddle.

Banana pancakes

  • 1 jumbo egg, beaten
  • 1 ripe banana
  • 2 Tbsp natural peanut butter
  • 1 Tbsp ground flax seed
  • 2 capfuls vanilla extract
  • Ground ginger & cinnamon (optional)
  • 1 Tbsp butter

Beat egg and work in peanut butter and banana (I broke it into small pieces first). Stir in flax and vanilla. Melt butter in cast iron skillet. Spoon batter into 4″ circles – these didn’t spread much. These don’t “bubble” like baking powder pancakes, so you’ll need to watch them for doneness. Plate them up, drizzle with real maple syrup & serve! Made five 4-inch pancakes (just right for one).

Dietary notes: Grain free, Gluten Free, Ovo-lacto vegetarian
Cost: $1.75 per serving, with real butter and 2 Tbsp. 100% maple syrup (WOW!)

Sweet potato pancakes: substitute 1 medium mashed sweet potato for the banana. You can increase eggs to two if the batter seems too dry.

The fritatta: delicious, nutritious egg-cellence!

The egg has been called a perfect food for years, but they’ve gained recent recognition for being even healthier than we thought! Throw in some fresh organic veggies & herbs and maybe a little cheese from grass-fed dairy cows and you’ve got delicious, nutritious Nirvana! Fritattas are a quick and super easy way to whip up a well-balanced meal – for one or for a crowd. Here are the basic ingredients:

Fritatta

  • Fresh local eggs (I use 2 per person)
  • Onions, veggies & herbs of choice
  • Crumbled or grated cheese (optional; 1/2 – 1 oz per person)
  • Extra virgin olive oil (evoo)
  • Salt & pepper

Saute your veggies in some olive oil (starting with the onions) til soft, sprinkle on your fresh herbs and cheese, then top with your beaten eggs seasoned with salt and pepper. Cook on low heat until top is fairly firm, loosen around the edges, then give it a minute or two under the broiler to brown the top. Slice into wedges and serve. That’s it!

This slideshow requires JavaScript.

And the beauty of this delightfully easy healthful dish is that in can be made for about $2 per serving with healthy real foods. What’s not to love?

Dietary notes: Grain Free, Gluten Free, Ovo-lacto Vegetarian
Cost: $2.00 per serving

I heart “real food”

As I write about the foods I prepare, I find myself wanting a simple phrase to describe the organizing principle behind my ingredients. They are most often some combination of fresh, local, unprocessed (or minimally so), organic, free-range, grass fed and relatively “whole.” You won’t see long mysterious words on the ingredients list. They don’t contain Genetically Modified Organisms (GMOs). You can see examples on my shopping list. I’ll call them “real foods” for shorthand – that’s so much easier than a long list of qualifiers!

Simple pleasure: cold coffee

Some call it iced coffee, but at my house it’s just cold. Every couple of days, I make a batch of hot coffee in my much-beloved glass Chemex. Even though I rarely drink more than one cup, I always make at least two. That un-drunk cup goes into a glass peanut butter jar (one of a dozen or so in my cupboard) and then into the fridge to be enjoyed at breakfast the next day. I used to pack a glass with ice and dress it up with raw sugar and milk or half and half, sometimes a splash of vanilla extract. But then the automatic ice-maker broke (as they always seem to do) and I just never get around to making cubes the old-fashioned way. At some point I stopped the milk, then the sugar, enjoying the deep roasted notes of my favorite French Roast from Jim’s Organic Coffee. Sipping cold coffee from a cold jar, over breakfast on the back deck, is one of those truly delicious simple pleasures of summer.

The next supper

If I were to start a list of Five Minute Foodisms, I’d put this near the top: always think about your next meal. Some of the biggest barriers to eating well are time and energy. So, save yourself a little of both by preparing some of your next meal along with your current one.

If you’re boiling eggs, chopping vegetables for a stir fry, making a sauce or washing greens for salad, prepare a little extra! At least enough for another meal or two. This is a routine time-saver for me. If I’m cutting up tofu or tempeh for a meal, I cut the whole block and store the rest. If I’m cleaning lettuce, I wash the whole head. If I’m slicing into an onion or tomato, I slice or chop the rest so it’s ready for the next meal, even if I’m not sure what it will be. When I get home from a long day of work, or am feeling lazy on a day off and don’t know what to make for dinner, I can say, well, I’ve got some chopped scallions and tomatoes…maybe a nice salad? Or an easy omelet?

Today I started building a salad with some lettuce, arugula, tomatoes, cucumbers and scallions. I washed extra lettuce and cut some extra scallion tops and threw the rest in containers. I threw in some tofu for protein and cubed the rest of the package. Then I whipped up about a cup and a half of peanut dressing, dressed my salad and put the rest in a glass bottle. It will keep in the fridge for weeks, and I’ll drizzle it over salad or one of my quick vegetable, grain and protein concoctions.

Cooking this way provides me with double the pleasure: a good meal in front of me and anticipation of the next one!